
This post was originally published on www.geico.com
It happens to everyone: the dreaded flat tire. At best, it happens near home in a neighborhood without a ton of traffic. At worst, you’re on the side of a high-speed road, in bad weather, wearing your best outfit and you’re trying to make it to an appointment.
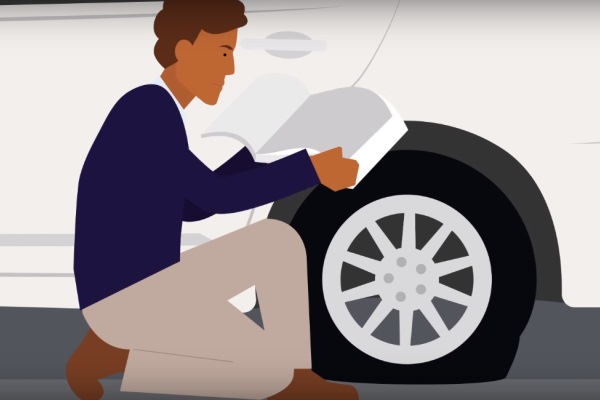
Not to worry! With this guide and video, you will learn how to change your tire quickly and easily.
Basics Of Tire Changing And Safety
It’s smart to keep step-by-step instructions (see below) on how to change a flat tire in your vehicle in case you’re ever in that situation. For all you visual learners out there, we’ve put together this how-to video that demonstrates the basics of how to change a tire safely and effectively.
IMPORTANT: A spare tire is not meant for extended travel, so only use your spare tire to drive to the nearest tire shop or home. Make sure you always have a spare tire, and check it a few times a year to ensure the air pressure is at a drivable level.
Check out our other Auto Maintenance instructional videos on how to change your wiper blades and how to check your tire pressure.
Essentials For Changing Your Tire
Keep these items in your vehicle at all times:
- Paper coveralls to protect your clothing (found at paint stores)
- Spare tire
- Car jack and tire tool
- 2-3 foot length of open-ended pipe that fits snugly on end of tire tool
- Gloves (great for any car troubles you may have)
- Flashlight (hands-free is best)
- Wipes for cleaning yourself off
- Vehicle owner’s manual
Step-By-Step Guide:
- Even if you are an expert at changing flats, getting a flat tire can be nerve-wracking and stressful. Most importantly, do not panic. Engage your emergency flashers to indicate to other drivers you are in distress, and maneuver to the side of the road as safely and quickly as possible.
- If you have a choice, pull as far off the road as possible and on the flattest and firmest ground you see. The more level and solid the ground, the better.
- Call for help if you are in an emergency lane or center lane on a main street or highway. It is not safe for you to work on the vehicle unless you are well off the road with plenty of room to work. If your only option is a soft surface, do not attempt to jack up your vehicle as this can pose major safety concerns. Call for help.
- Once in a safe location, have all passengers exit the vehicle and stand as far away from moving traffic as possible.
- Set the car in park and set the emergency brake. If you have a manual transmission, leave the car in first gear or reverse.
- Consider placing a brick, large rock or log behind one of the undamaged tires to prevent the vehicle from rolling. This is especially important if you’re on an incline. If your vehicle is facing uphill, place the object behind the tire to prevent back-rolling. If your vehicle is facing downhill, place the object in front of the tire.
- Locate your spare tire and tools (in a sedan or coupe, these items are typically in the trunk; in an SUV, they are often mounted on the back or underside). Set the items you need near your work space. Try to stay as far away from moving traffic as possible.
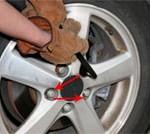
 If the lug nuts (the things that hold your tire on) aren’t exposed and visible, you’ll probably need to remove the hubcap. Use the flat end of the tire tool to pry the hubcap off, being careful not to dent or bend it. This should reveal the lug nuts.
- Don’t jack the car up until after you’ve loosened the lug nuts. Otherwise your tire will spin in the air, making removal impossible.
- Lug nuts need to be loosened using the tire tool. Slip the tire tool over the first lug nut, then slide the pipe onto the end of the tire tool. The pipe gives you extra leverage. Don’t be afraid to put muscle into it.
- Once the first lug nut is loosened, leave it on for the time being. Skip every other lug nut, working your way around until all lug nuts have been loosened. Remember: righty-tighty, lefty-loosey.
 At this point, you’re ready to jack your car up. Slide the jack under your car frame and pump or turn the lift. Only lift your car until the tire is barely off the ground. It is very important to reference your owner’s manual for proper placement of the car jack.
- Completely remove the lug nuts and place them in your pocket or hubcap for safe keeping.
- Remove the tire by pulling straight away from the car.
 Lift the spare tire onto the screw prongs, lining up the screws with the holes in the tire. Remember that the air valve should be facing OUT. Screw on the lug nuts by hand, alternating as you go with every other one, just until they’re all secured. Then go back with the tool and tighten them slightly.
- Lower the car with the jack just enough so that the tire doesn’t spin.
- Using your tire tool, tighten the lug nuts in the same pattern as you loosened them. Turn them to the right to tighten and put some strength into it!
- Lower the vehicle all the way and remove the jack.
- Reinstall the hubcap if you have one.
- Drive carefully to the nearest tire shop.
 If the lug nuts (the things that hold your tire on) aren’t exposed and visible, you’ll probably need to remove the hubcap. Use the flat end of the tire tool to pry the hubcap off, being careful not to dent or bend it. This should reveal the lug nuts.
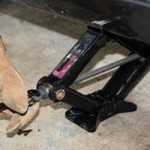 At this point, you’re ready to jack your car up. Slide the jack under your car frame and pump or turn the lift. Only lift your car until the tire is barely off the ground. It is very important to reference your owner’s manual for proper placement of the car jack.
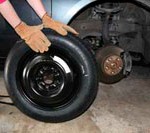 Lift the spare tire onto the screw prongs, lining up the screws with the holes in the tire. Remember that the air valve should be facing OUT. Screw on the lug nuts by hand, alternating as you go with every other one, just until they’re all secured. Then go back with the tool and tighten them slightly.
 Using your tire tool, tighten the lug nuts in the same pattern as you loosened them. Turn them to the right to tighten and put some strength into it!
For additional information and details for changing your vehicle’s flat tire, reference the owner’s manual for your vehicle.
If you ever get stranded with a flat tire, having GEICO Emergency Roadside Service can be a lifesaver. For just pennies a day per vehicle, you can have peace of mind that roadside help is only a call or a tap away. Be sure to add it to your policy today.
By Dawn McCaslin
[ad_1]